5 Week 4- More advanced scripting and introducing genetic variants
5.1 Main Objectives
- Independently write and run simple scripts using slurm
- Build for loops to automate scripts to run across multiple files
- List the steps of the pipeline for identifying genetic variants
- Organize simple commands into scripts to execute a variant calling pipeline
5.2 Warm up: Runnning scripts
- Change directories to your personal directory.
- Run a script that is located in a
week4_warmupfolder by typing:
/group/rbaygrp/eve198-genomics/week4_warmup/message1.sh- You can also use relative paths to run programs in different folders. Using a
relative path from your own personal directory, run the program
/group/rbaygrp/eve198-genomics/week4_warmup/message2.sh. - Find the output of
message2.shin your personal directory.
5.3 Writing for loops
Loops are key to productivity improvements through automation as they allow us to execute commands repeatedly. Similar to wildcards and tab completion, using loops also reduces the amount of typing (and typing mistakes). Loops are helpful when performing operations on groups of sequencing files, such as unzipping or trimming multiple files. We will use loops for these purposes in subsequent analyses, but will cover the basics of them for now.
When the shell sees the keyword for, it knows to repeat a command (or group of commands) once for each item in a list.
Each time the loop runs (called an iteration), an item in the list is assigned in sequence to the variable, and
the commands inside the loop are executed, before moving on to the next item in the list. Inside the loop, we call for
the variable’s value by putting $ in front of it. The $ tells the shell interpreter to treat the variable
as a variable name and substitute its value in its place, rather than treat it as text or an external command. In shell programming, this is usually called “expanding” the variable.
Sometimes, we want to expand a variable without any whitespace to its right.
Suppose we have a variable named foo that contains the text abc, and would
like to expand foo to create the text abcEFG.
$ foo=abc
$ echo foo is $foo
foo is abc
$ echo foo is $fooEFG      # doesn't work
foo is
The interpreter is trying to expand a variable named fooEFG, which (probably)
doesn’t exist. We can avoid this problem by enclosing the variable name in
braces ({ and }, sometimes called “squiggle braces”). bash treats the #
character as a comment character. Any text on a line after a # is ignored by
bash when evaluating the text as code.
$ foo=abc
$ echo foo is $foo
foo is abc
$ echo foo is ${foo}EFG      # now it works!
foo is abcEFG
Let’s write a for loop to show us the first two lines of the fastq files we downloaded
last week. You will notice the shell prompt changes from $ to > and back again as
we were typing in our loop. The second prompt, >, is different to remind us that
we haven’t finished typing a complete command yet. A semicolon, ;, can be used
to separate two commands written on a single line.
$ cd /group/rbaygrp/eve198-genomics/yourdirectory/Week2/untrimmed_fastq$ for filename in *.fastq
> do
> head -n 2 ${filename}
> doneThe for loop begins with the formula for <variable> in <group to iterate over>.
In this case, the word filename is designated as the variable to be used over
each iteration. In our case SRR097977.fastq and SRR098026.fastq will be
substituted for filename because they fit the pattern of ending with .fastq
in the directory we’ve specified. The next line of the for loop is do. The next
line is the code that we want to execute. We are telling the loop to print the
first two lines of each variable we iterate over. Finally, the word done ends the loop.
After executing the loop, you should see the first two lines of both fastq files printed to the terminal. Let’s create a loop that will save this information to a file.
Note that we are using >> to append the text to our seq_info.txt file. If we used >, the seq_info.txt file would be rewritten
every time the loop iterates, so it would only have text from the last variable used. Instead, >> adds to the end of the file.
$ for filename in *.fastq
> do
> head -n 2 ${filename} >> seq_info.txt
> done
When writing a loop, you will not be able to return to previous lines once you have pressed Enter. Remember that we can cancel the current command using
- Ctrl+C
If you notice a mistake that is going to prevent your loop for executing correctly.
5.4 Using Basename in for loops
Basename is a function in UNIX that is helpful for removing a uniform part of a name from a list of files. In this case, we will use basename to remove the .fastq extension from the files that we’ve been working with.
$ basename SRR097977.fastq .fastqWe see that this returns just the SRR accession, and no longer has the .fastq file extension on it.
SRR097977If we try the same thing but use .fasta as the file extension instead, nothing happens. This is because basename only works when it exactly matches a string in the file.
$ basename SRR097977.fastq .fastaSRR097977.fastqBasename is really powerful when used in a for loop. It allows to access just the file prefix, which you can use to name things. Let’s try this.
Inside our for loop, we create a new name variable. We call the basename function inside the parenthesis, then give our variable name from the for loop, in this case ${filename}, and finally state that .fastq should be removed from the file name. It’s important to note that we’re not changing the actual files, we’re creating a new variable called name. The line > echo $name will print to the terminal the variable name each time the for loop runs. Because we are iterating over two files, we expect to see two lines of output.
$ for filename in *.fastq
> do
> name=$(basename ${filename} .fastq)
> echo ${name}
> done
If we want to print the file prefix of all of the .txt files in our current directory, we would run the following code:
$ for filename in *.txt
> do
> name=$(basename ${filename} .txt)
> echo ${name}
done
One way this is really useful is to move files. Let’s rename all of our .txt files using mv so that they have the years on them, which will document when we created them.
$ for filename in *.txt
> do
> name=$(basename ${filename} .txt)
> mv ${filename}  ${name}_2019.txt
> done
What if we put the wrong year and actually want to remove the 2019 from all of our .txt files?
 $ for filename in *_2019.txt
> do
> name=$(basename ${filename} _2019.txt)
> mv ${filename} ${name}.txt
> done
Now write your own for loop it to have _2026 at the end of each of our .txt files!
$ for filename in *.txt
> do
> name=$(basename ${filename} .txt)
> mv ${filename}  ${name}_2026.txt
> done
5.5 Writing scripts: Slurm
You can also write scripts using a resource manager called “Slurm” (It is a reference to the show Futurama where there is a soda called slurm). Slurm can be really helpful for writing scripts and submitting jobs since you can schedule and run larger jobs. I use this personally in my own research. The set up is pretty similar. First let’s create a simple script:
nano HelloWorld.shFor a slurm script we need more information in the header of our script so that it knows what account to run on and the amount of time you want to give to your job:
- All scripts start with
#!/bin/bash - The next line is your email address so you can get an email when your job finishes
- Then add information on if you want an email for all notifications (began, ended, failed, etc)
- Next is the name of the job, or job ID
- The name of your error log file
- The name of your output log file (usually the same name as your error)
- The number of processors per task
- The minimum number of nodes you need for your job. Small jobs don’t need a lot of nodes/memory
- The amount of memory for your job
- The requested time for your job. Some jobs take a really long time, I had one run for several months! For this class you only need to put in 90 minutes.
- The partition to submit to, low is the one we will be using
After those headers you write out your script!
#!/bin/bash
#SBATCH --mail-user=youremail@ucdavis.edu       # YOUR EMAIL ADDRESS
#SBATCH --account=rbay-eve198-genomics-grp      # GROUP
#SBATCH --mail-type=ALL                         # NOTIFICATIONS OF SLURM JOB STATUS - ALL, NONE, BEGIN, END, FAIL, REQUEUE
#SBATCH -J HelloWorld                           # JOB ID
#SBATCH -e HelloWorld.j%j.err                   # STANDARD ERROR FILE TO WRITE TO
#SBATCH -o HelloWorld.j%j.out                   # STANDARD OUTPUT FILE TO WRITE TO
#SBATCH -c 1                                    # NUMBER OF PROCESSORS PER TASK
#SBATCH --ntasks=1                              # MINIMUM NUMBER OF NODES TO ALLOCATE TO JOB
#SBATCH --mem=1Gb                               # MEMORY POOL TO ALL CORES
#SBATCH --time=00-00:11:00                      # REQUESTED WALL TIME
#SBATCH -p low                                  # PARTITION TO SUBMIT TO

echo "Hello World!" > hello_world_output.txt
Then when you are ready to run your job you type
$ sbatch HelloWorld.shWant to check the status of your job? Type squeue -uyourusername, or use the fun shortcut,squeue –me. Once your job is done, typels. There should be a new text file in your directory calledhello_world_output.txt`. What does it say?
$ cat hello_world_output.txtMore information on slurm scripts in on the hpc webpage: https://hpc.ucdavis.edu/faq/slurm
5.7 Mini Lecture
Slides can be accessed here
This is the general pipeline of what we will be doing today: 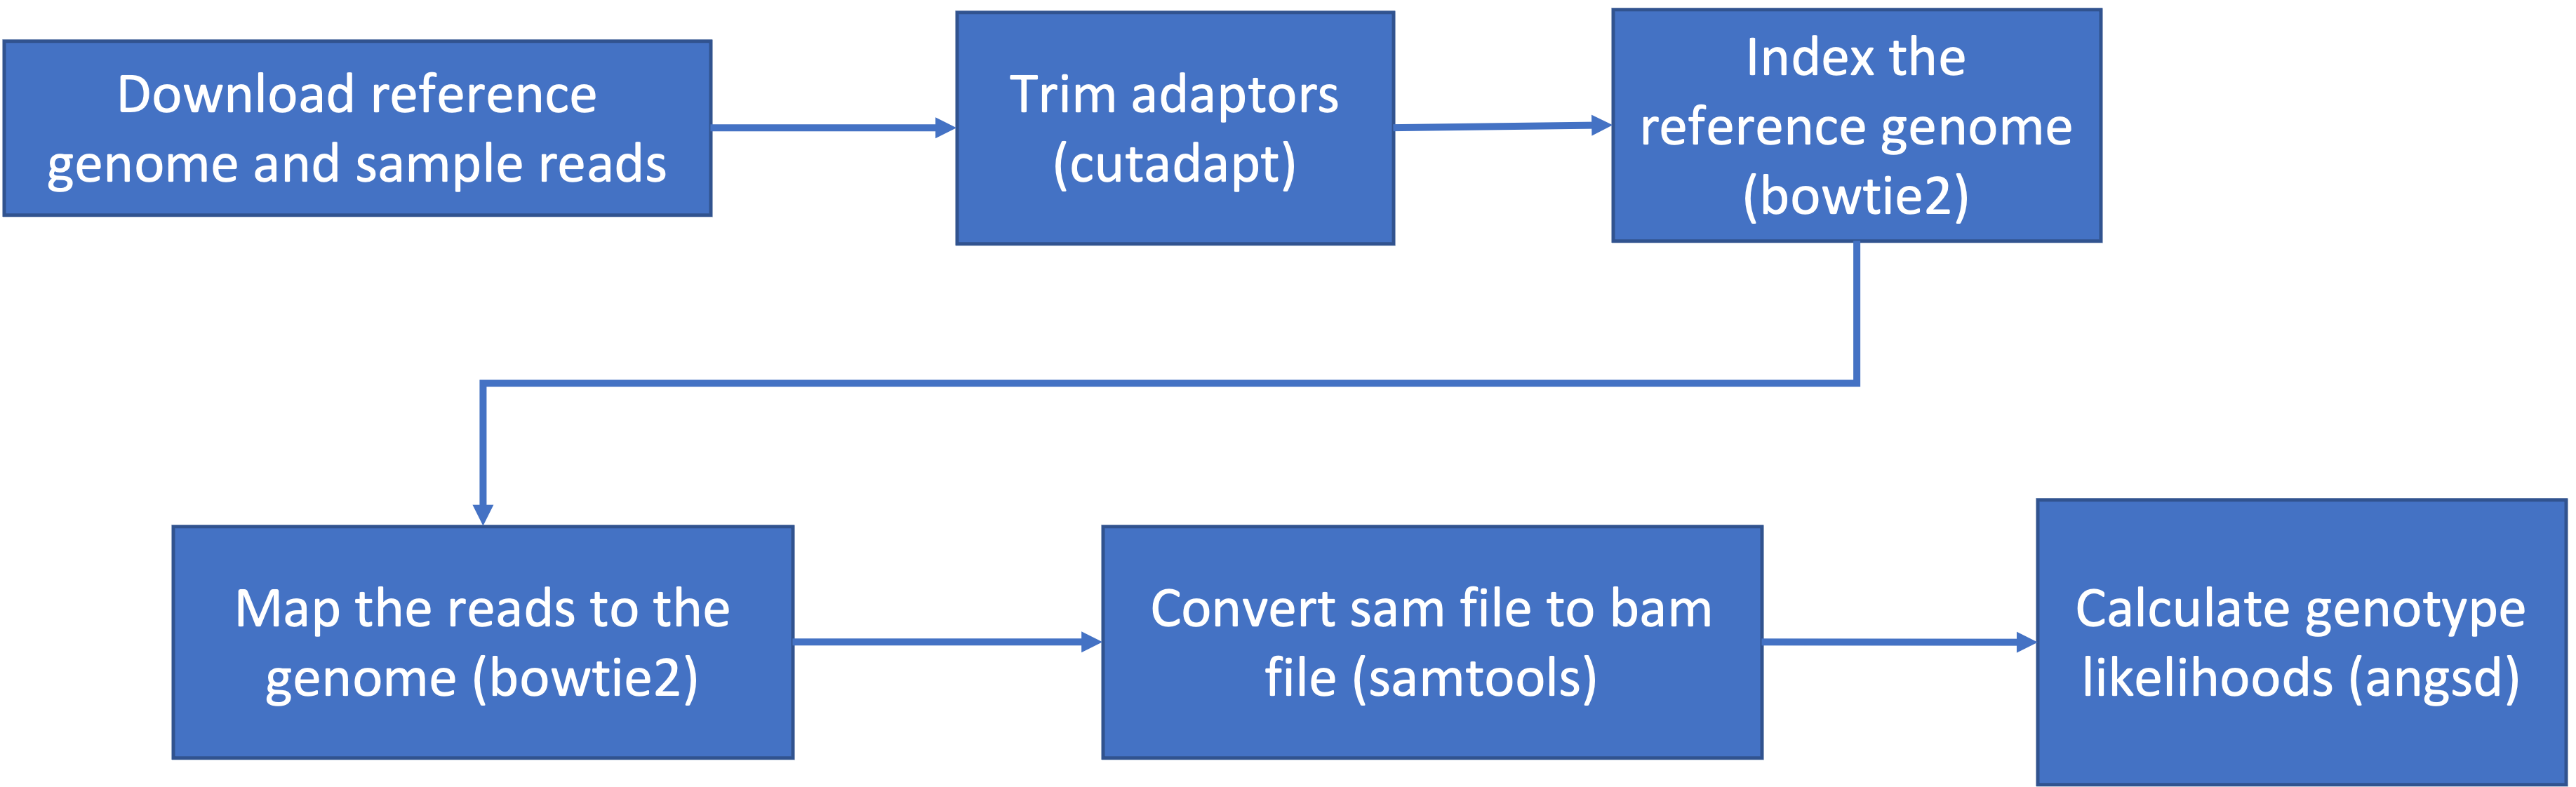
5.8 Step 0: Download data and load programs
5.8.1 Download Data
We’ve used wget before, but to give you a bit more informations, it is short
for “world wide web get”, and it’s basic function is to download web pages or data at a web address.
We will be using wget to retrieve data from the class github, but if you want more practice with this tool there is an additional tutorial below:
Download the data from the IntroGenomics_Data Week 4 repository on github in your individual directory. Make sure you are there first before you do the wget step!
$ cd /navigate/to/your/directory

$ wget https://raw.githubusercontent.com/mlarmstrong/IntroGenomics_Data/main/week4.zip
And then unzip week4 so we can work with the data inside:
$ unzip week4.zip5.8.2 Load programs
These are the programs we will be using today:
- fastqc: used to view the quality of the read files
- cutadapt: will trim adaptor sequences from the reads
To load the first program, type the following code:
$ module load fastqcYou should get something on your screen that looks like this:
$ module load fastqc
Loading openjdk/17.0.11_9

Loading fastqc/0.12.1
  Loading requirement: openjdk/17.0.11_9
This will load our module! Check to see that it loaded and what version you are working with using this command:
$ fastqc -v
FastQC v0.12.1
This tells us that we have fastqc loaded and we are using version 0.12.1. This is important information to report in papers too when you discuss what genomics methods you’ve used. Most of the package we use have names that match their module names, but cutadapt is a bit different. To load cutadapt and check the version, type:
$ module load py-cutadapt
$ cutadapt -v
Notes on loading programs:
- Every time you start a new OnDemand session, you’ll start with a blank slate and will need to load any modules you want to use, so next time you start up a session, fastqc and py-cutadapt won’t be pre-loaded
- You can load a module from any directory, and then use it in any directory
Class Exercise 1
Load all both packages and check their versions.
Change directories so that you are inside the week4 directory inside your individual directory. Confirm that you see6 files with a
.fastq.gzextension and 1 genome file with a.fna.gzextension.Imagine you have a program in mind and want to check if it’s available as a module on our cluster Type in
module availand scroll through the list to see what programs are already downloaded and easy to use.
5.9 Step 1: Raw read quality control
Next let’s use the program fastqc to check the quality of our data files:
$ fastqc SRR6805880.tiny.fastq.gz- Readout should include:
- Started analysis for SRR6805880.tiny.fastq.gz
- Analysis complete for SRR6805880.tiny.fastq.gz
Let’s look to see that it worked
$ ls

Ppar_tinygenome.fna.gz       SRR6805880.tiny_fastqc.zip  SRR6805883.tiny.fastq.gz
SRR6805880.tiny.fastq.gz     SRR6805881.tiny.fastq.gz    SRR6805884.tiny.fastq.gz
SRR6805880.tiny_fastqc.html  SRR6805882.tiny.fastq.gz    SRR6805885.tiny.fastq.gz
Looks good! Fastqc generated two outputs for us, a .html and a .zip
directory
Let’s run fastqc on the remaining files, and then we’ll take a look at
the output. You may have noticed fastqc just used the same file name to
produce our output with different extensions. We can take advantage of
that by running fastqc on all our datafiles with the wildcard *.
$ fastqc SRR680588*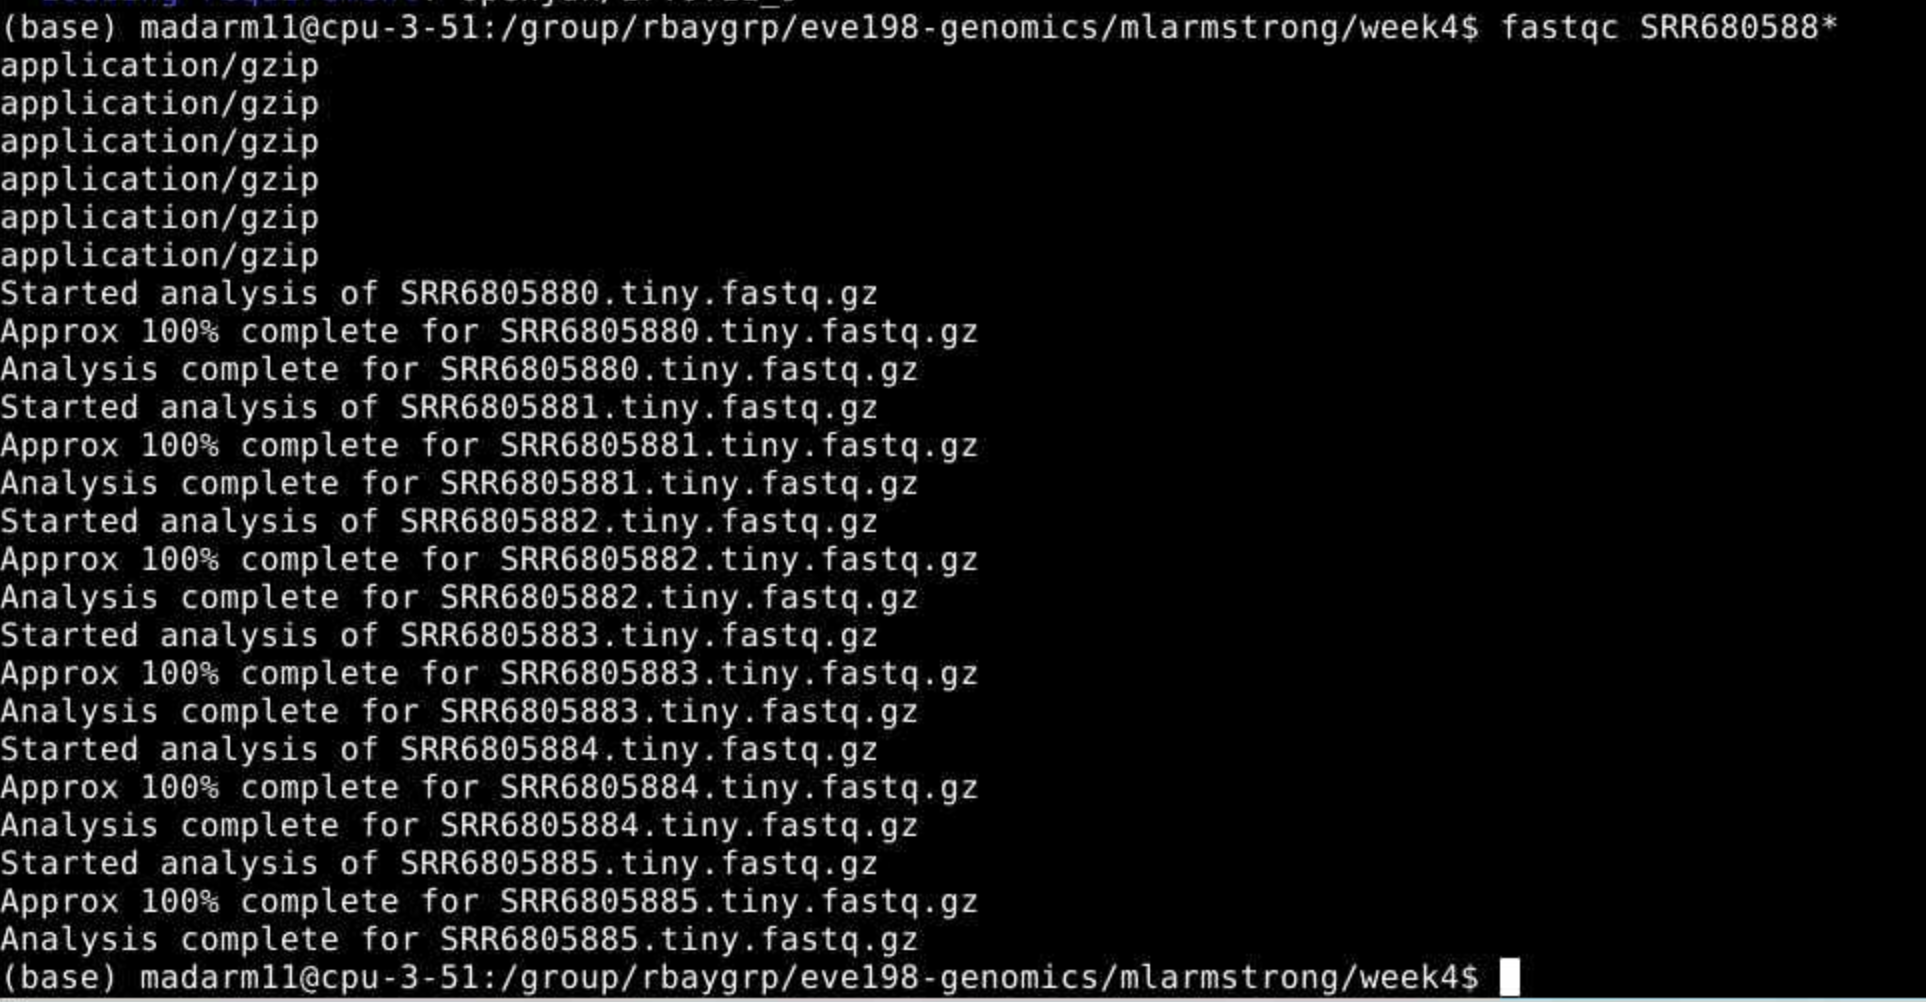 You may
initially get an error message because fastqc doesn’t see the .fastq
file extension on some of our files. It simply skips these and moves on
the the next file.
You may
initially get an error message because fastqc doesn’t see the .fastq
file extension on some of our files. It simply skips these and moves on
the the next file.
To view the output of fastqc you can access the html files for each sample using the OnDemand GUI.
Class Exercise 2: looking at your fastqc.html files!
Open the yellow “Home” folder on your OnDemand session and use the top search bar to navigate to
home/group/rbaygrp/eve198-genomics/yourdirectory/week4. Click on on of your fastq output files (with the suffix fastqc.html) to view the quality information of a fastq files.
5.10 Step 2: Trimming to remove adapters
There are many programs to trim sequence files. Cutadapt is relatively easy to run with the code below, once we have identified our adaptor sequence and takes the general form below.
$ cutadapt -g SEQUENCETOTRIM -o name_of_input_file name_of_output_file Let’s do this on one of our files to test it out.
cutadapt -g TGCAG SRR6805880.tiny.fastq.gz -o SRR6805880.tiny_trimmed.fastq.gz This works for a single file, but if we want to do it for all our read files we need to either do them all individually (slow and error prone) or use a for loop.
for filename in *.tiny.fastq.gz
do

  base=$(basename $filename .tiny.fastq.gz)
  echo ${base}

  cutadapt -g TGCAG ${base}.tiny.fastq.gz -o ${base}.tiny_trimmed.fastq.gz

done
Yay! You should see a little report for each of these files that showing how many reads were trimmed and some other info (how long are the reads, etc)
You can check if the trimmed files are there with:
ls *trimmed*Class Exercise 3
Run fastqc on our .trimmed reads and compare the html with the .untrimmed files. What main difference do you see between them?
Our reads are now ready to be mapped to the genome!
5.11 Group Work Activity- Calling Variants at a Larger Scale
For this exercise we ran everything in the same directory and you can
see that we generated quite a few files by the time we were done. Many
population genomic studies have data for hundreds of individuals and
running everything in the same directory gets confusing and messy.
However, having the data in a different directory from the output
complicates running things a little (you have to remember which
directory you’re in). Make a new directory inside your own week4
directory called raw_data and mv the raw data files (those that end
in .fastq.gz, and the tinygenome, ending in .fna) into it.
Then move everything that we generated so far into a folder called old_outputs.
Now you can write your own slurm script to run through fastqc and cutadapt. Use
the code above to help you process everything in one single script. You should
save the fastqc outputs in a folder called fastqc and the adapter trimmed
sequences into a folder called trimmed_fastqs. Submit a
copy of your script for this activity on canvas under the ‘Assignments’
tab for ‘Week 4: Calling Variants’.
5.12 Key Points
- The general pipeline for identifying genetic variants first starts with trimming adaptors from the sample reads, indexing the reference genome, mapping the reads to the genome, converting the sam file to a bam (binary) file and then calculating the genotype likelihoods.
- There are many tools that are useful for calling genetic variants, including samtools, bowtie2, cutadapt and
- SAM and BAM files are similar, but BAM files are in a binary format which makes it easier to process and call SNPs
- ANGSD is a useful program for calculating genotype likelihoods and accounts for uncertainty due to sequencing errors and/or mapping errors
Class Exercise Solutions
Exercise: Solutions
Exercise 1.
Exercise 2. just look at your html files!
Exercise 3. We should no
longer see the red error flag for the per base sequence quality or base pairs conten. code: fastqc *trimmed.fastq.gz ## Exercise 4: The full genome and full read files should have a much higher mapping rate (70-80%) > than our subset.
for filename in *tiny.fastq.gz; do; base=$(basename $filename .tiny.fastq.gz); echo=${base}; bowtie2 -x Ppar_tinygenome.fna.gz -U ${base}.tiny.fastq.gz -S ${base}.nottrimmed.sam; done